
Advanced Window Management on MacOS
Macs are widely considered to be some of the best laptops on the market today. Designed with a focus on productivity, programming, and performance - what I call the 3 🅿️'s - they are my go-to system for pretty much everything except gaming. However, one area where MacOS falls short is in the window management department. While multiple spaces, desktops, and the new stage manager may work for some, they just don't cut it for many of us - especially those who prefer to keep their hands on the keyboard (looking at you, dirty Vim fanatics 👀).
In this blog post I’ll go over some nifty tech that can help with this, going from the easiest to setup to some more advanced tools.
Raycast
When it comes to boosting productivity on Mac, there's one app that stands head and shoulders above the rest: Raycast. This nifty little tool acts as a replacement for Spotlight search (which you can access using ⌘ + Space), but it offers so much more functionality than the standard search bar - and the best part? It's completely free!
Raycast doesn’t necessary have to do with window management but it’s an amazing tool for those who are accustomed to Mac desktops.

Awesome Raycast Features
- Opening an app
- Basic math calculations
- System Actions (such as turning on bluetooth, increasing volume, etc.)
- Searching the web using Google
- Searching for a file
- Searching recent screenshots or copy/paste history
- Creating your own snippets (I use this all the time for code snippets!)
You're probably wondering - Bik what the hell does this has to do with window management? Well, friend, Raycast lets you quickly set the current window’s size and open or switch to an app!
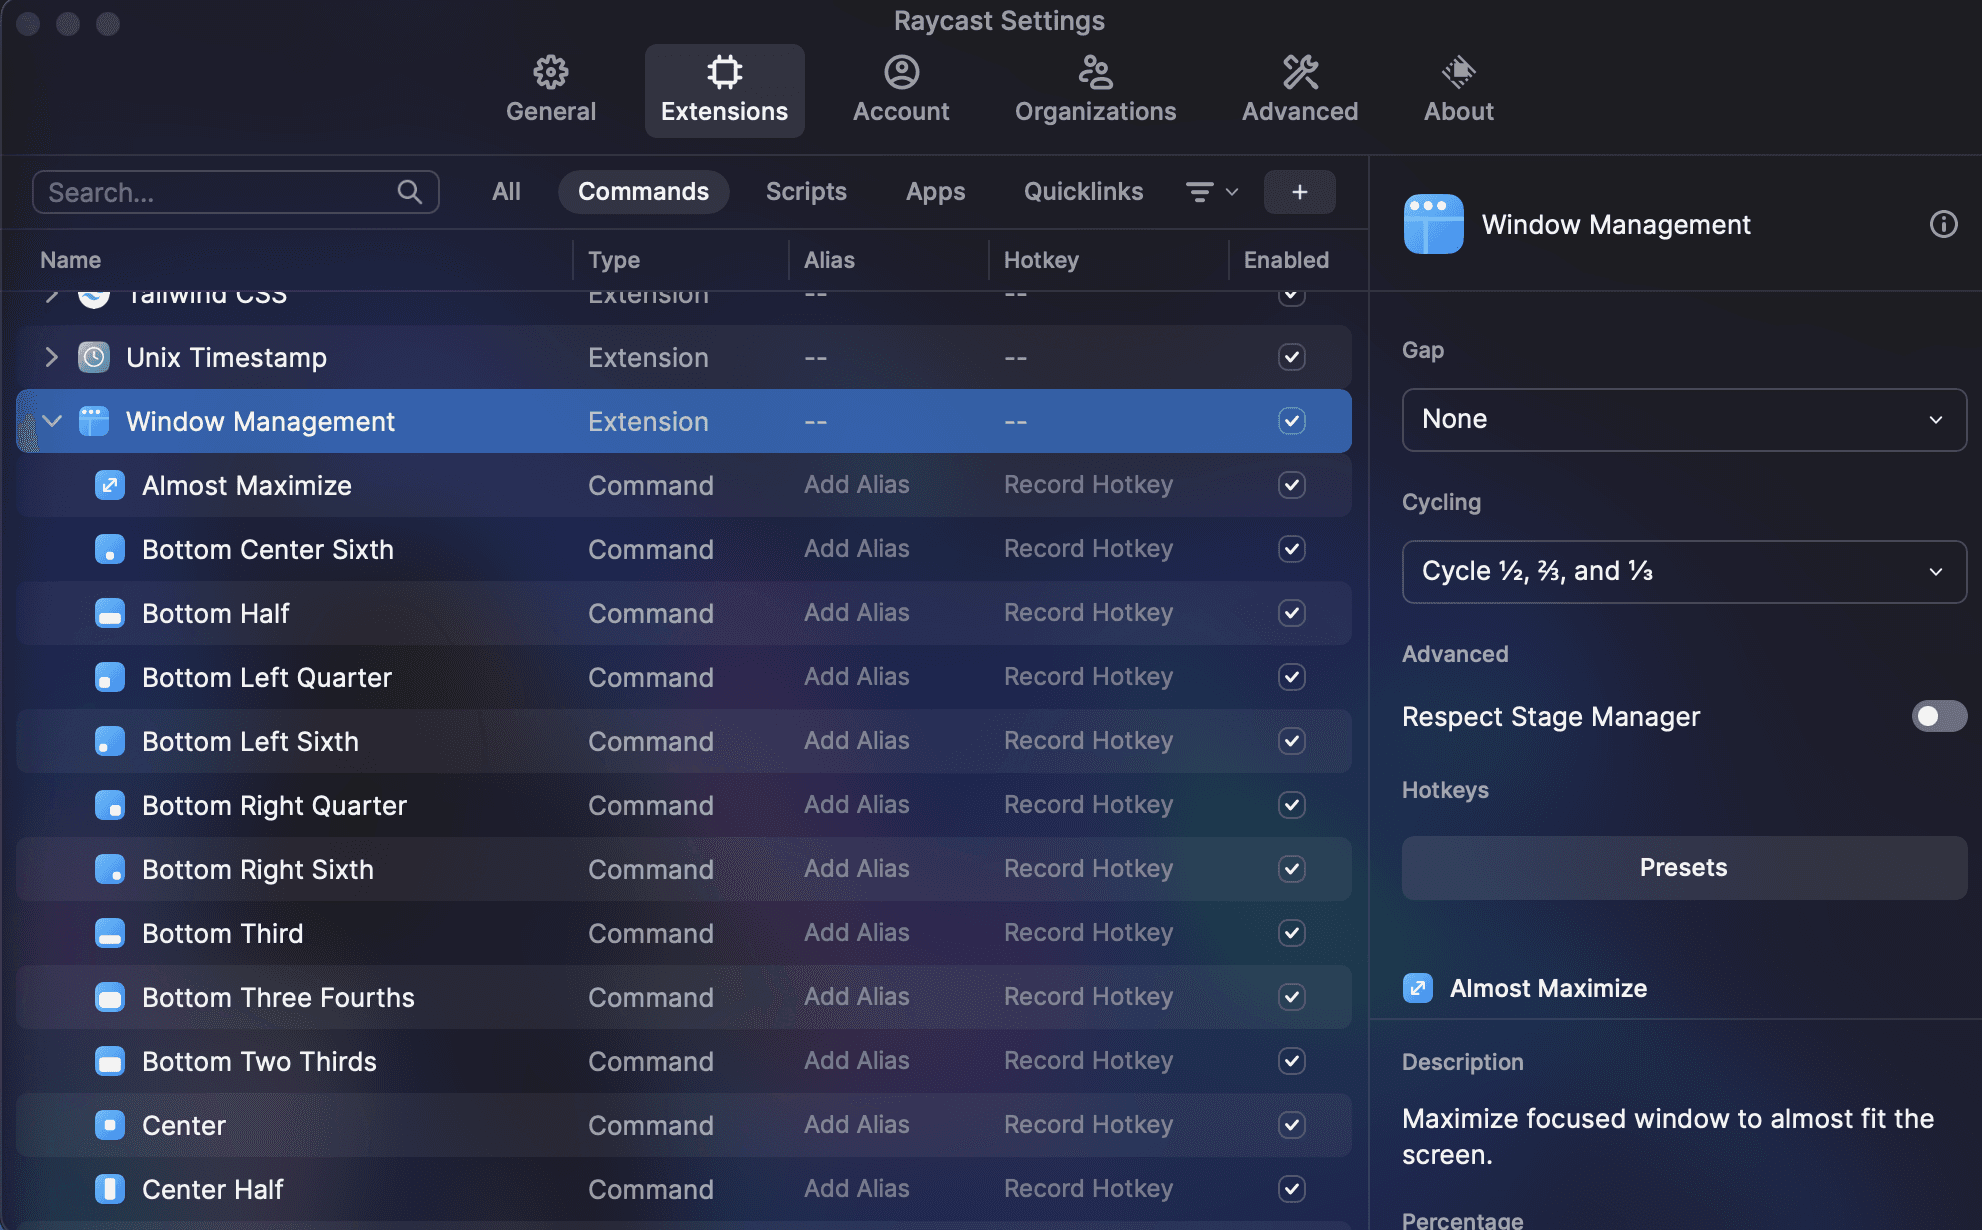
The use cases for Raycast are pretty much endless though as they have a growing extension library.
My favorite Raycast extensions
- Calendar
- Color Picker
- Spotify Controls
- Cheat sheets for documentations
- Hypersonic x Notion task manager
- Linear integration
- Todoist integration
- Speedtest
SpaceLauncher
Get ready to have your mind blown, because the next app on this list is basically wizardry. Imagine being able to switch between apps using just the spacebar - no need to touch your mouse, trackpad, or even fiddle with complicated shortcuts. Sound too good to be true? Well, it's not - it’s SpaceLauncher.
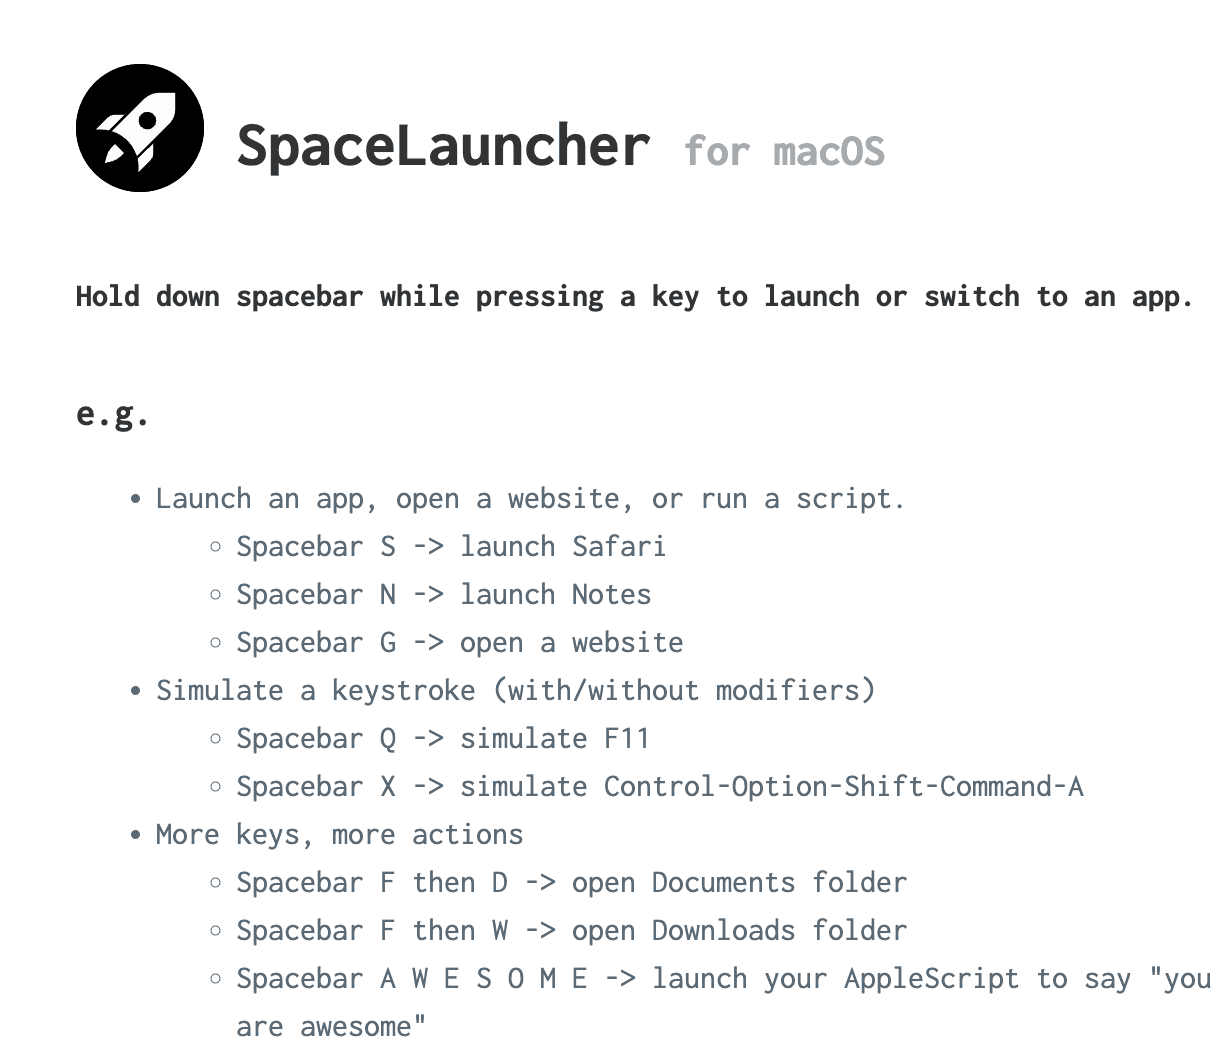
Here’s the explanation from the docs - all you have to do is hold Spacebar for a specified amount of time and your key of choice and it opens your app or website! I use it all the time to quickly switch between VSCode, Arc Browser, Figma, and kitty. The only downside is you can’t hold the spacebar to add a bunch of spaces as text anymore. But really, how many times were you doing that anyways? Just spam the spacebar if needed.
Yabai + SKHD (⚠️ Advanced)
The final and ultimate window manager is a combination of 2 exciting tools: Yabai and SKHD. Note: this takes a bunch of setup and some technical knowledge.
Yabai
Yabai is a tiling window manager that auto-formats your window layout on Mac using binary space partitioning. That sounds confusing, I know, but I’ll show you a simple visual representation below. It essentially handles resizing multiple apps on a single desktop automatically.
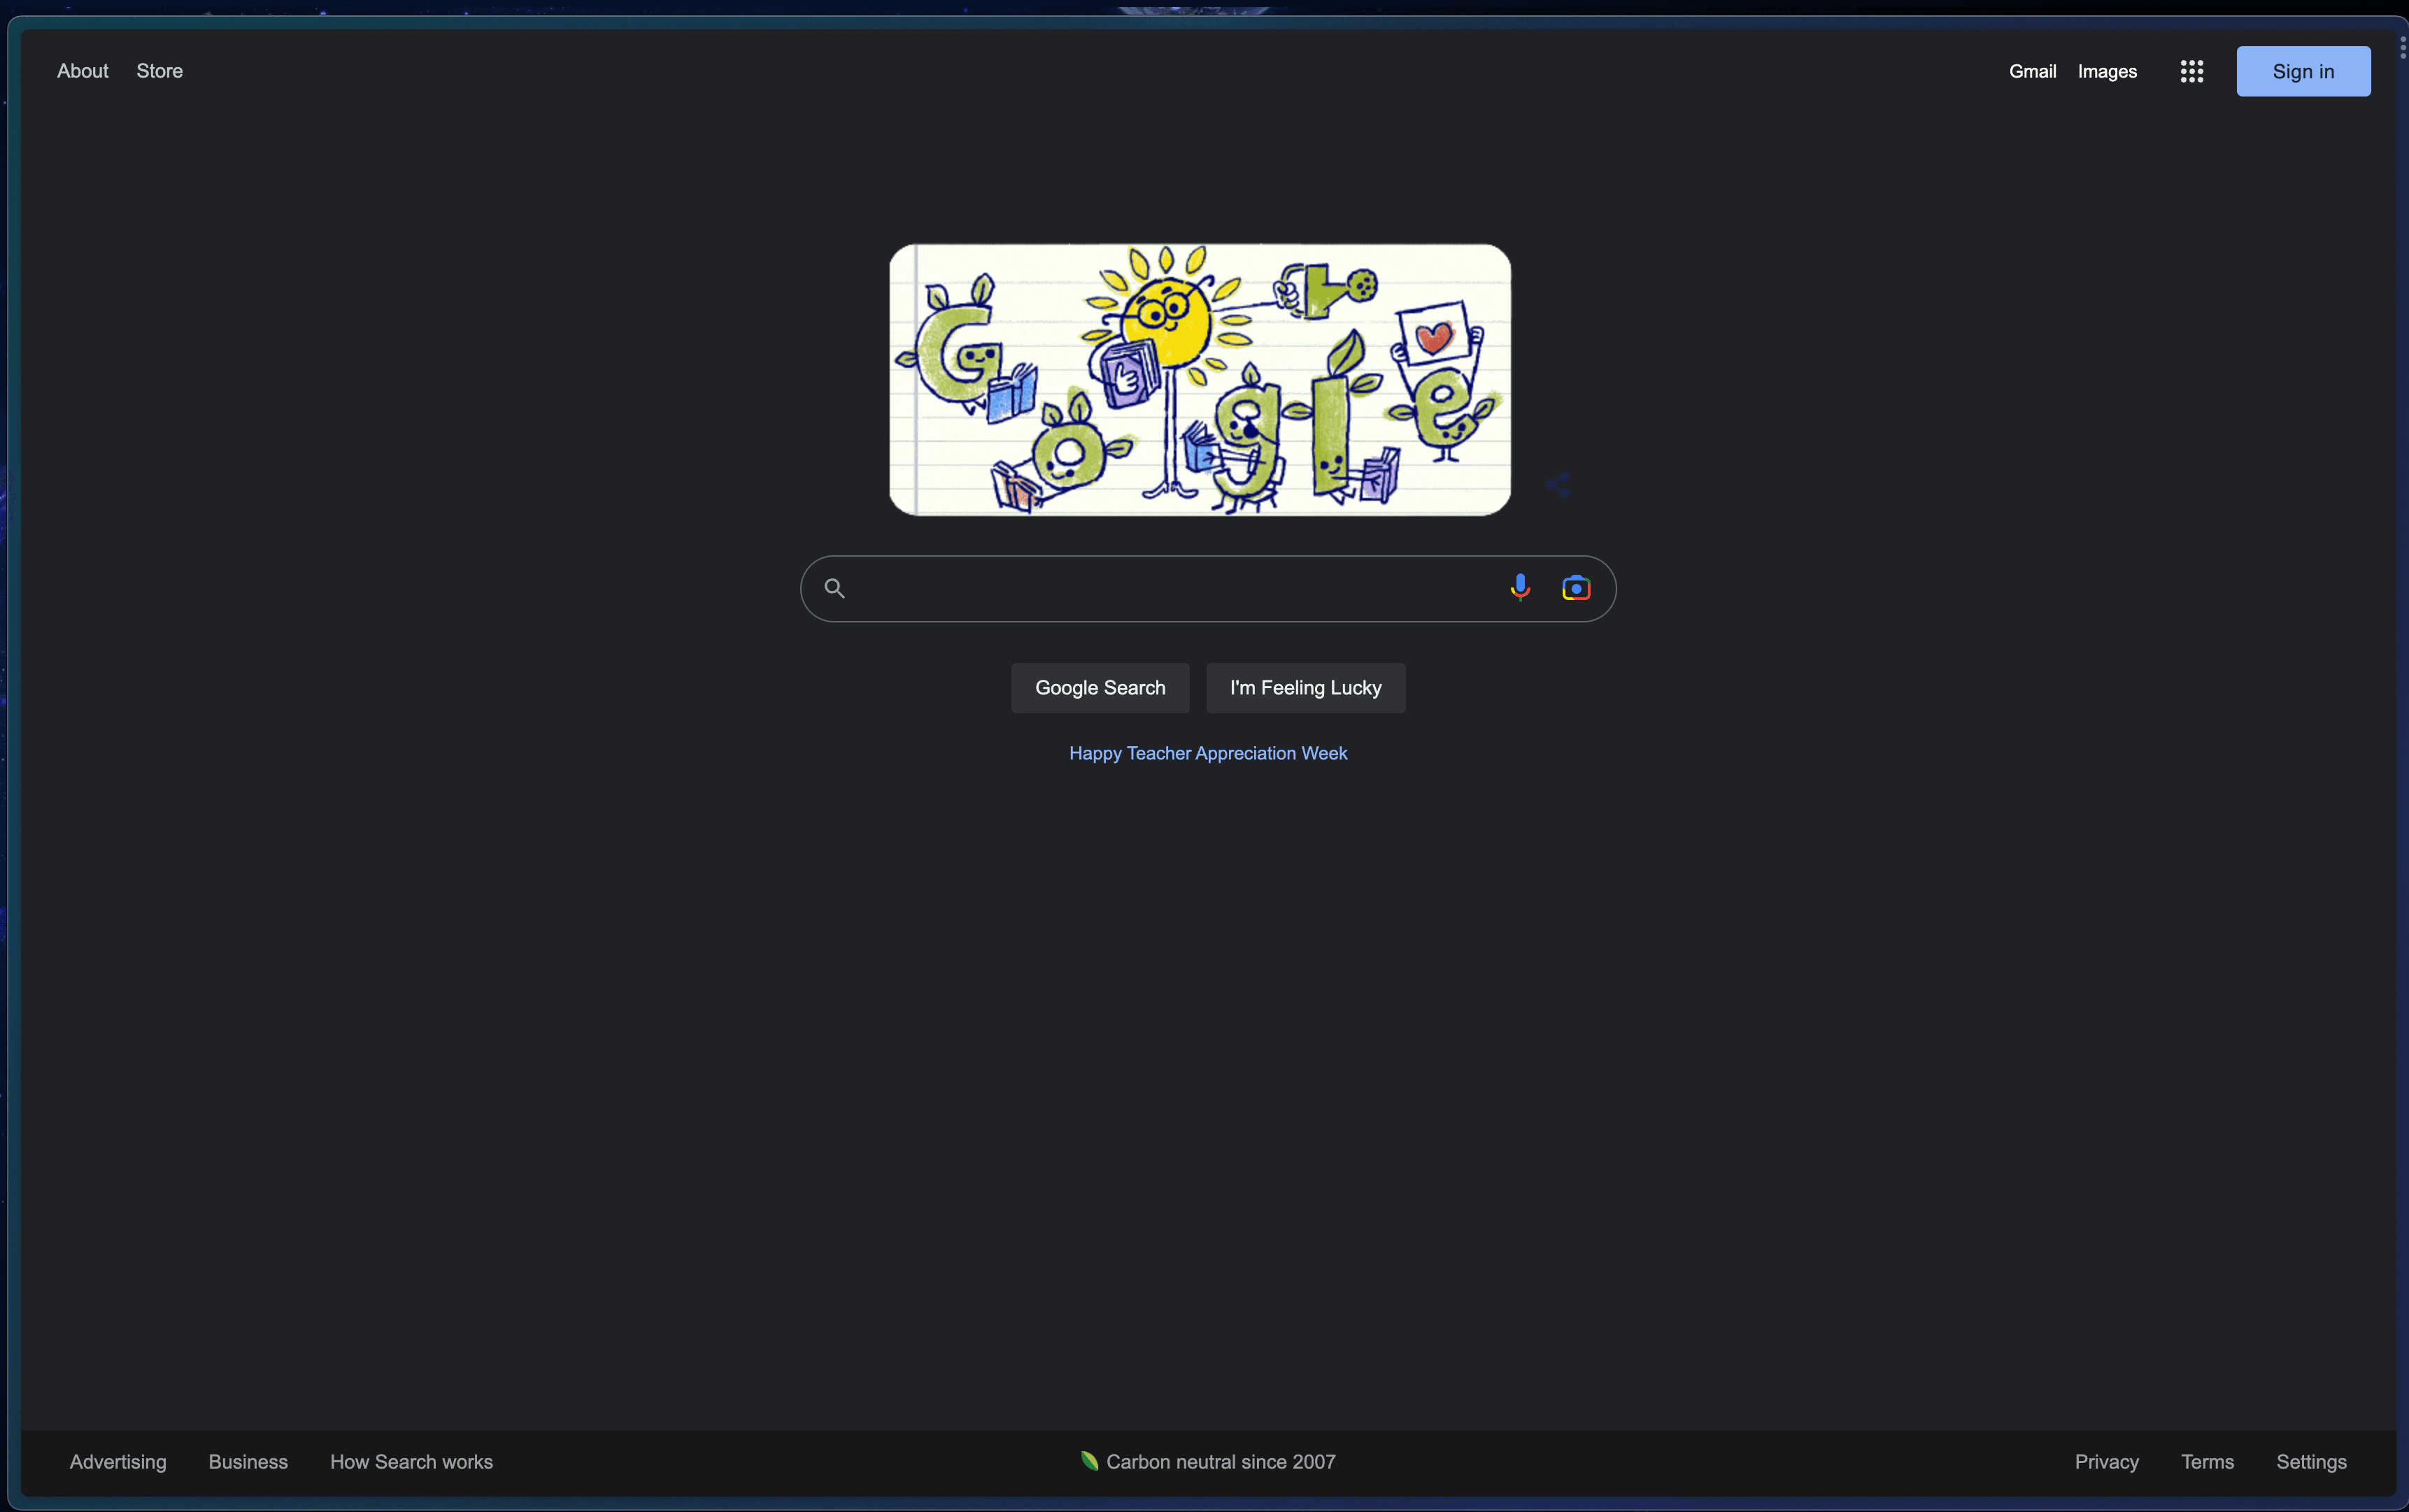
Let’s say you have a single app open on your desktop. Here I have Arc open to a new tab of Google:
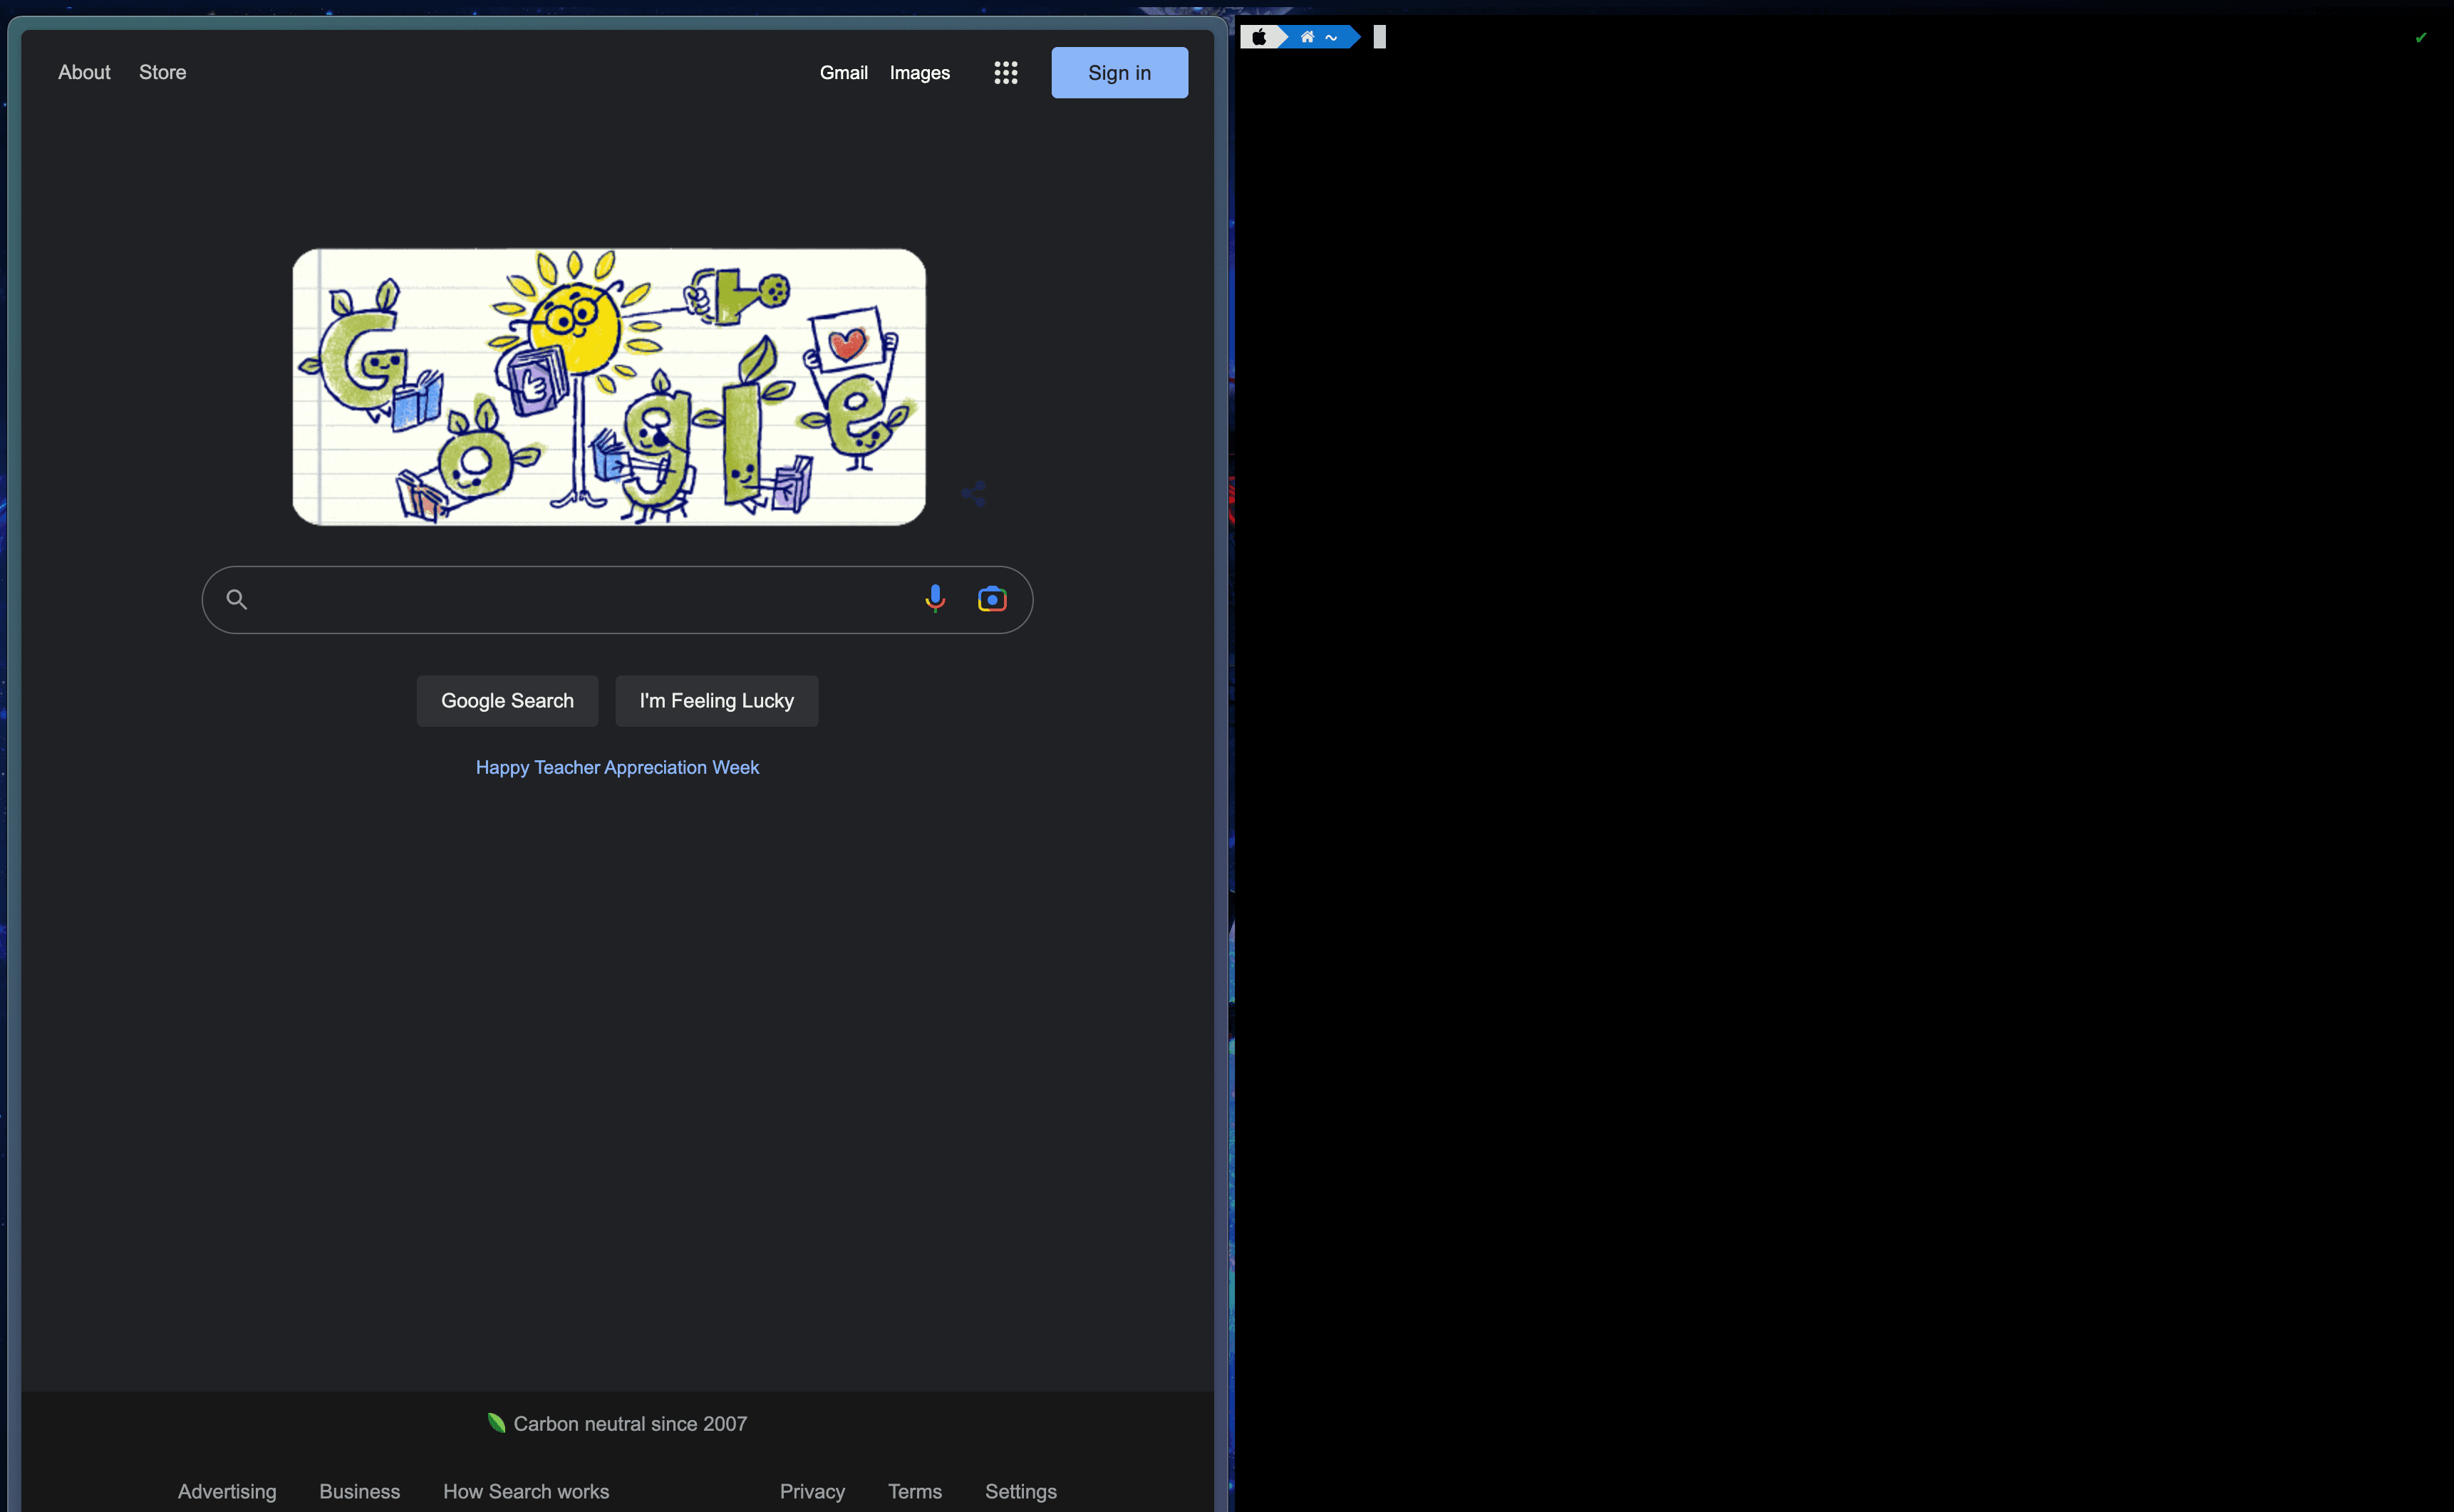
Now, let’s say I open an instance of my terminal client, Kitty. Yabai automatically handles sizing them equally into halves on the screen.
Let’s see what happens when I open up 2 more windows of Kitty:

As you can see, the tiles are automatically sized and laid out on a grid instead of all above each other.
Installing Yabai
Disable System Integrity Protection
This sounds scary but disabling SIP allows you to do a lot more with Yabai.
FROM YABAI WIKI:
-
Turn off your device
-
Intel (apple docs):
Hold down command ⌘R while booting your device.
Apple Silicon (apple docs):
Press and hold the power button on your Mac until “Loading startup options” appears.
Click Options, then click Continue.
-
In the menu bar, choose
Utilities, thenTerminal
## APPLE SILICON
## If you're on Apple Silicon macOS 13.x.x
# Requires Filesystem Protections, Debugging Restrictions and NVRAM Protection to be disabled
# (printed warning can be safely ignored)
csrutil enable --without fs --without debug --without nvram

# If you're on Apple Silicon macOS 12.x.x
# Requires Filesystem Protections, Debugging Restrictions and NVRAM Protection to be disabled
# (printed warning can be safely ignored)
csrutil disable --with kext --with dtrace --with basesystem

## INTEL
## If you're on Intel macOS 13.x.x, 12.x.x, or 11.x.x
# Requires Filesystem Protections and Debugging Restrictions to be disabled (workaround because --without debug does not work)
# (printed warning can be safely ignored)
csrutil disable --with kext --with dtrace --with nvram --with basesystem
-
Reboot
-
For Apple Silicon; enable non-Apple-signed arm64e binaries
# Open a terminal and run the below command, then reboot
sudo nvram boot-args=-arm64e_preview_abi
Install and Run Yabai
Install using brew
brew install koekeishiya/formulae/yabai
Start with the following command
# start yabai
yabai --start-service
Configure scripting addition
# create a new file for writing - visudo uses the vim editor by default.
# go read about this if you have no idea what is going on.

sudo visudo -f /private/etc/sudoers.d/yabai

# input the line below into the file you are editing.
#  replace <yabai> with the path to the yabai binary (output of: which yabai).
#  replace <user> with your username (output of: whoami).
#  replace <hash> with the sha256 hash of the yabai binary (output of: shasum -a 256 $(which yabai)).
#   this hash must be updated manually after running brew upgrade.

<user> ALL=(root) NOPASSWD: sha256:<hash> <yabai> --load-sa
Update Config Files to your liking
Your .yabairc controls all your customizations. You can find it in ~/.yabairc usually. Here’s mine as an example:
yabai -m signal --add event=dock_did_restart action="sudo yabai --load-sa"
sudo yabai --load-sa
yabai -m config debug_output on
# Custom Space Names
yabai -m space 1 --label one
yabai -m space 2 --label two
yabai -m space 3 --label three
yabai -m space 4 --label four
yabai -m space 5 --label five
yabai -m space 6 --label six
yabai -m space 7 --label seven
yabai -m space 8 --label eight
yabai -m space 9 --label nine

# Ignores tiling for the following apps
yabai -m rule --add app="^System Settings$" manage=off
yabai -m rule --add app="^Karabiner-Elements$" manage=off
yabai -m rule --add app="^Karabiner-EventViewer$" manage=off
yabai -m rule --add app="^Finder$" manage=off
yabai -m rule --add app="^Disk Utility$" manage=off
yabai -m rule --add app="^System Information$" manage=off
yabai -m rule --add app="^Activity Monitor$" manage=off
yabai -m rule --add app="^Logi Options$" manage=off
yabai -m rule --add app="^Facetime$" manage=off
yabai -m rule --add app="^Zoom$" manage=off
yabai -m rule --add app="^Messages$" manage=off
yabai -m rule --add app="^1Password$" manage=off
yabai -m rule --add app="^Discord$" manage=off
yabai -m rule --add app="^Screenshot$" manage=off
yabai -m rule --add app="^Simulator$" manage=off

# Binary space partitioning
yabai -m config layout bsp
yabai -m config focus_follows_mouse off
yabai -m config mouse_follows_focus off
yabai -m config window_shadow on
yabai -m config top_padding    5
yabai -m config bottom_padding 5
yabai -m config left_padding   5
yabai -m config right_padding  5
yabai -m config window_gap     5
It’s always a good idea to turn off the tiling manager for apps that you don’t need fullscreen (or that don’t work fullscreen, like Facetime). You can check out more config options here.
SKHD
SKHD goes hand in hand with Yabai - it’s just a simple hotkey daemon that allows you to set custom keybinds that you can use to move around screens and apps controlled by yabai.
To install and run:
brew install koekeishiya/formulae/skhd
skhd --start-service
Then update the config in either one of these directories: $HOME/.config/skhd/skhdrc OR $HOME/.skhdrc.
Here’s my config as an example (I believe I got some of these online but forgetting where):
# Navigation
alt - h : yabai -m window --focus west
alt - j : yabai -m window --focus south
alt - k : yabai -m window --focus north
alt - l : yabai -m window --focus east

# Moving windows
shift + alt - h : yabai -m window --warp west
shift + alt - j : yabai -m window --warp south
shift + alt - k : yabai -m window --warp north
shift + alt - l : yabai -m window --warp east

# move window and focus desktop
shift + alt - 1 : yabai -m window --space 1; yabai -m space --focus 1
shift + alt - 2 : yabai -m window --space 2; yabai -m space --focus 2
shift + alt - 3 : yabai -m window --space 3; yabai -m space --focus 3
shift + alt - 4 : yabai -m window --space 4; yabai -m space --focus 4
shift + alt - 5 : yabai -m window --space 5; yabai -m space --focus 5
shift + alt - 6 : yabai -m window --space 6; yabai -m space --focus 6
shift + alt - 7 : yabai -m window --space 7; yabai -m space --focus 7
shift + alt - 8 : yabai -m window --space 8; yabai -m space --focus 8
shift + alt - 9 : yabai -m window --space 9; yabai -m space --focus 9
shift + alt - 0 : yabai -m window --space 0; yabai -m space --focus 0

# move managed window
shift + alt + ctrl - h : yabai -m window --warp west
shift + alt + ctrl - j : yabai -m window --warp south
shift + alt + ctrl - k : yabai -m window --warp north
shift + alt + ctrl - l : yabai -m window --warp east

# Resize windows
lctrl + alt - h : yabai -m window --resize left:-50:0; \
                  yabai -m window --resize right:-50:0
lctrl + alt - j : yabai -m window --resize bottom:0:50; \
                  yabai -m window --resize top:0:50
lctrl + alt - k : yabai -m window --resize top:0:-50; \
                  yabai -m window --resize bottom:0:-50
lctrl + alt - l : yabai -m window --resize right:50:0; \
                  yabai -m window --resize left:50:0

# increase window size
shift + alt - w : yabai -m window --resize top:0:-20
shift + alt - d : yabai -m window --resize left:-20:0

# decrease window size
shift + alt - s : yabai -m window --resize bottom:0:-20
shift + alt - a : yabai -m window --resize top:0:20

# Equalize size of windows
lctrl + alt - e : yabai -m space --balance

# Enable / Disable gaps in current workspace
lctrl + alt - g : yabai -m space --toggle padding; yabai -m space --toggle gap

# Rotate windows clockwise and anticlockwise
alt - r         : yabai -m space --rotate 270
shift + alt - r : yabai -m space --rotate 90

# Rotate on X and Y Axis
shift + alt - x : yabai -m space --mirror x-axis
shift + alt - y : yabai -m space --mirror y-axis

# send window to monitor and follow focus
shift + alt - n : yabai -m window --display next; yabai -m display --focus next
shift + alt - p : yabai -m window --display previous; yabai -m display --focus previous

# Make window native fullscreen
alt - f         : yabai -m window --toggle zoom-fullscreen
shift + alt - f : yabai -m window --toggle native-fullscreen

# fast focus desktop
alt - 0 : yabai -m space --focus recent

# create desktop, move window and follow focus - uses jq for parsing json (brew install jq)
shift + alt - n : yabai -m space --create && \
                   index="$(yabai -m query --spaces --display | jq 'map(select(."native-fullscreen" == 0))[-1].index')" && \
                   yabai -m window --space "${index}" && \
                   yabai -m space --focus "${index}"

# float / unfloat window and center on screen
alt - t : yabai -m window --toggle float;\
          yabai -m window --grid 5:5:1:1:2:2

# Restart Yabai
shift + lctrl + alt - r : \
    /usr/bin/env osascript <<< \
        "display notification \"Restarting Yabai\" with title \"Yabai\""; \
    launchctl kickstart -k "gui/${UID}/homebrew.mxcl.yabai"
Rotating windows basically moves around the windows on the screen either clockwise or counter-clockwise. You can now try out these commands and absolutely speed through your workflow.
Other Mac Settings you may need to disable for Yabai X SKHD
Displays have separate Spaceshas to be enabled under MacMission ControlsettingsAutomatically rearrange Spaces based on most recent usemust be disabled
That’s it! Hope you enjoyed this rundown of window management on Mac. Hopefully Apple will natively support keyboard shortcuts or have better window management in the future but for now, these apps should help a ton 😄.